How to make a Map from Beginning to End
(to the Mods, i posted this in both 3rd party and FAQ's because i didnt know
where to post because i explain how to use alot of 3rd party software here aswell, please delete which ever is in-apporpriate)
Ok i decided to write this FAQ for people wishing to make a map from nothing
there are some 3rd party programs you will need. as well as RUNUO
and ill give you a couple websites to help you out aswell..
First the programs i would recommend getting are
all these programs have different limits when it comes to making a map
so trust me and download them all.
1.)First steps
2.)Dragon or mapgenerator (well get into that after)
3.)RUNUO
4.)Pandoras Box 2
5.)Worldforge
6.)Map editor, Multi editor
7.)UOcopy
1.) First steps
issues to resolve first
- First in your Ultima online dir you will have to delete all the files that say
Mapdif0.mul mapdif1.mul or statdif.mul anything with a Dif in it.
If you do not parts of the original felluca/trammel map will appear on your
new map.
2.)Dragon / Worldbuilder.
Both are avalible at Ryandor.com
Step 1 The Choice - First you have to make a choice. i would recommend
Dragon mod 11 for the newbie. because worldmaker involves more work
but can do more... first Dragon cannot handle 3 way transitions thats the
Main difference, for example if you have a road that goes through grass
and connects to mountain where the road mountain and grass meet it
will look messed up, and you will have to go over it again in worldforge
and fix it later. its not really a big deal anyway but some people think it
is. Ill explain dragon. because this post is for newbs.
Dragon mod 11
Step I Installation - First install dragon. depending on weither you
get dragon in a RAR file or a EXE file the installation is Different. either way youll end up with a directory called lets say "c:\dragonmod11\" just to make it easy, you will need either Adobe Photoshop or Gimp, If you dont have Adobe and dont want to buy it, you can download Gimp from GIMP - The GNU Image Manipulation Program
Step 2 Setup - You will need to map a BMP file that is 6144 x 4096 in either Adobe Photoshop or Gimp,. you will need to load the swatchs from the "c:\DragonMod11\Addon" directory this will give you a list of different colors all which will have a label such as Ocean -5, Grass 0. the
name is what you will be drawing with. if you use grass when you compile the map that area will be grass ETC. now that you have swatchs added your color the left side of the map specifically from pixel 5123,0 to pixel
6144 x 4096 (bottom right corner) with Black 0, that will make the area
that is required for dungeon building. i recommend making the rest of the map Ocean -5, so now you should have about 3/4ths the map Blue and
about 1/4th black.. ok thats your template save that.
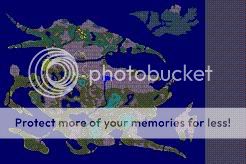
here is an example of how it should look

Step 3 Creation - Feel free to fill your ocean with the love of some islands of your creation. personally i would leave the dungeons black. and just leave big open "grass 0" areas for your citys (ill explain why in worldforge and map editor later)
Step 4 Things you should know - make all your in-land rivers with
water -5, instead of ocean -5, also you must make somthing approx 10 or more pixels of water -5 around all the shores of every island, and the mainland. so it might be prudent to paint your Ocean -5, white first since it is very hard to distiguish, the Ocean -5 to the Water -5 swatch. now if you dont surround your islands with water -5 your shorelines will be messed up beyond repair. so listen to me i know. also you cannot make the whole world water -5 since everything made with water -5 becomes shore you will have so much lag god couldnt make your server work. not to mention you would need about 25 gigs of ram to compile the map. so listen to what i say.. also to keep your ground looking nice. make sure if you have say sand beach to grass to jungle there is atleast 3 distance between the sand and the jungle or none at all because it needs space to transition things out. otherwise youll get transition errors like mad. another thing to know each pixel represents 1 tile in game. so 1 pixel of grass = 1 tile of grass in game..
Here is a picture of my map so you can get a look at a complete map prior to compiling
Step 5 Compile me baby - after you have completed the map to the point where you are happy save it, (of course) leave adobe or gimp,. and load Dragon,. you need to fill in 2 feilds BMP file needs to know the Location of your .bmp file you made. Mul needs to know the location of your map0.mul file. so fill in those feilds and press compile. and let it make your map...
Step 6 Dragonsp - after you complete making the map load the program called Dragonsp it needs to know where your static files are so provide it with your Ultima Dir. also on the left side it wants to know what you want to create,. select all the txt files to the left. this is whats responsible for building your coastlines, forests and etc.. if you want to change what is in forests, or on grass,. for example i removed trees from grass so players could build houses easyer,. go to the text documents in the dragon scripts dir load "grass" or whatever you wish and delete "green tree" and the instructions that follow. you can also decrease the frequency they are spawned by changing the second number. they are in C:\dragonmod11\scripts\items\*.*
if your interested.....
Now you can load your basic map in game "on to the next steps"
3.) RUNUO
install RUNUO set it up and make sure it works. download from here RunUO.com - The RunUO Gaming Network
Next follow these steps
Step 1 - Make a new directory in Runuo.
I.E C:\RunUO 1.0\Custom Maps\
Step 2 - Copy and Paste the files staidx0.mul, statics0.mul to the
new folder you have just created above.
Step 3 - go to C:\RunUO 1.0\Scripts\Misc\Datapath.cs
Open Datapath.cs within the first few lines you will have to
change it to this.
Custom Maps directory as the servers static files
this way you can add to them without effecting your
Client
Adding to Static Files In Runuo - its much like the [wipe command
first you build a structure or trees etc. then you
type the command [Freeze and select the area that
you wish added to the static files...
Seeing what you have done in the game - For you or your players
to see what you have done in the game. you will
have to copy the Staidx0.mul and Statics0.mul from
your custom maps directory into your Ultima online
Directory. (you do not have to restart the server.
to do this but you have to turn off your client
while you do.) you can send these files to your
players and have them also put them in there
game dir and replace the original files..
4.)Pandoras Box 2
you should get this program because it makes map making easyer
big time. it has a list of all static items in the game. and a roof builder
that makes building in RUNUO alot easyer. you can get the program from
here but you will have to sign up. Welcome to LEARNUO.COM
Step 1 Setup - When you install Pandoras box it will ask you a bunch of
questions. name fill it all in. you will come to a part where it asks you
if you use Custom maps. say NO it doesnt work right if you do. also
do not enable box server either. you dont need it to edit the map.
Step 2 Functionality - Lets go through a few functions you can use ok 1
go to the Deco subsection,. there is a list of Deco you can use to decorate
your houses,. build houses, build docks etc.. Pandoras box has the most
in the way of items for you to add currently. also its easyer to build in RUNUO
then map editor i find. ill explain map editors best functions later. ok another
function youll need to know. is go to the tools subsection, then Options and
Select it, select the map section in there. for editing purposes select Felluca
Only, everytime you make a big addition to the map, you will have to use it to
Refresh the map image. so remember that..
Step 3 tips and trick - Not to many tips and tricks in here but, one of the nice
things about the tools page is you will see roofing. its not to hard to do. to
make some roofs others are harder ill give you some tips first how to place a
roof. if you build a roof its at the top of the walls. generally 20 z if your ground
is zero and you have no foundation on the house. so lets use that..
in the roofing tool. what you will first see is 2 x/y cords with "get from client"
underneath where should you start and finish a roof. the easyest roofs are
goes up and tent. go with tent and select a ceramic roof of your choice and
my little template ill make here for an example.
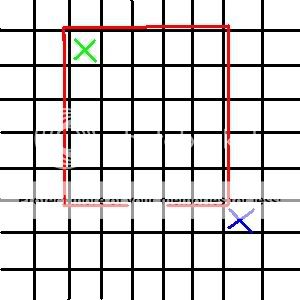
Ok the black is your grid, the red is your house walls, where the Green is press the first "get from client" you will notice numbers fill int, now from the Blue X place your second "get from client". select Tent from the list. then select a ceremic Tileset,. change the height to 20 so on top of your walls and press add section,. in the window to the left you will see something that looks very similar to this..
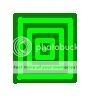
that is your roof by layer. you can choose to Test your roof and it will show you the 4 corners first before you generate it completely,. or just generate,. when you are done your roof will be done.. (things that commenly happen that get on your nerves is the UO client will act up and spawn only some of your roof. it sounds retarted but to fix this. keep running around in your client while the roof generates and it will keep the generation active) anyway, if your satisfied with your creation you can commit by Freezing it like we covered in the RUNUO section.
5.)Worldforge
You can get worldforge hereRyandor.com
This section is to explain worldforge, ok now install worldforge. much like dragon there is an installer version and a RAR version,. you should non-the less get a folder called "c:\worldforge\" lets say. run Worldforge.exe. now when you run it
it will ask you again for your statics, staidx. mul locations, enter the location of those for worldforge (example c:\program files\ea games\ultima online\statics0.mul)
now it will also ask you for somthing called items.wsc
Items.wsc
you dont need to enter this unless you want to copy portions of a map to your map. say you wanted to keep britain in your map,. you would need to enter a location. (its for UOX aswell) anyway Items.wsc just enter a folder i recommend your ultima online folder so enter "c:\program files\ea games\ultima online" or whatever. ill explain this file more with UOcopy.
Map Editing in Worldforge.
Although map editor has some really neet functions ill tell you about worldforge anyway. some of the things you can do. first you can set and altitude it will stay at that altitude while you edit, unlike Wfmap. so if you intend to make a town at level 20 altitude i recommend making the streets in this. to map edit simply click the map edit function. and select the proper locations for your map and art files.
if it doesnt show your map right away reload worldforge. you can enter map cords to go to. or move around the map and edit at your will.. you can select a tile from the list or select random grass, dirt etc from the list. why you need worldforge,. WFmap's pallete is kinda limited at this point and it its alot easyer to work on elivated places in worldforge because of the lock altitude function.
Making caves.
the easyest way to make a cave,. go to runuo. find the map cords you want to be a cave, write them down. close runuo. and go to worldforge. go to those cords. flatten all the mountain to the altitude of outside the cave lets use 0 grass just because.. no close worldforge re-open runuo. and pandoras box. go to the location,. and use pandoras box to build a cave. with walls etc. connect it to the side of the mountain so that the cave tiles meet the transition tiles. then [freeze the cave. go back to worldforge raise the mountain all back up and and add an entrance to where your cave meets the side of the mountain.. ( you cant see static files in worldforge. so the best way i found to do it. is Delete the 3 or 4 mountain to grass transitions, start your cave from that spot. and when you freeze it. just make a cave entrance where the deleted transition tiles are.
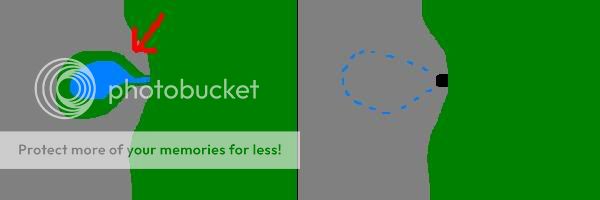
STEP 1 STEP 2
Like i said step 1 lower all the area Then go back to Worldforge
you want to be cave to 0, change it to And turn all the grass at altitude
grass aswell (will be easyer to spot 0 to mountain 30, and add an
in worldforge) then go to runuo and Entrance..
pandoras box build the cave (you
can even dye it) freeze it.
Legend
Green - Grass at the Altitude of Zero.
Grey - Mountain at the altitude of 30
Blue - Cave tiles made by pandoras box at the Altitude of 0 like the grass
That about covers it for worldforge
6.)Map editor
Map editor is a great program. you can get it here http://worldmaker.ryandor.com/news.php
or here (which you have to get the pallete from anyway
Ryandor.com
its quite easy to use and can almost do anything. its team partner is called multi editor ill explain that after....
Step 1 - First you need to download and install it, and download and install the QTcore 4.1.2 *.dlls and the ming .dll which you can get from the first link, and the pallette, that you can get from the second link (easy to install just unrar it all in the same dir. while your at it download multi editor aswell same page. ill explain that next)
Step 2 - ok when you load it for the first time. go to Options, Mul locations. and fill in all the locations of your Mul files,. (the ultima directory yet again. big suprise eh?) also as long as the pallette files are in the main dir,. they should work,. now there are 2 editing modes here Art and Terrain... first
I) Art - in art you can edit art by turning on Palette in >Veiw>Palette.
you can add walls plants etc. everything like runuo..
its a little harder to work with because unlike worldforge and
pandoras box. you cannot lock the altitude at the level you are
working at so you have to continually go back and set it for all items
what i have found it good for is
A.) placing cave entrances.
B.) doing dungeons (because normally they are all at 0 for the most
part
the reason for both is the fact that in this program you can see both
Art and terrain at the same time.
II) Terrain - although you cant set it to make random mountain, or lock altitude
you can see both terrain and art at the same time. which is great for
making your town layouts and your dungeon layouts. which is exactly
what i would recommend this program for at this point.
Problems with Map editor.
-Like i mentioned before you cant lock altitude
-The Palette is limited, it includes about a 3rd of the items
that are in pandoras box.
Great things about map editor.
-It makes creating dungeons and city layouts easy
-helps with cave entrances because you can see
your static tiles you placed with pandoras box.
Multi Editor..
This program allows you to build, buildings, or ruins or things to import
to the map editor program. youll notice the interface is almost identical
its installed into the same dir as Map editor, so you have the same
palette and it has the same limiting palette problem. i really havent used this
program much, because its far easyer at this point to create a building
using Runuo. but ill provide a lesson just because
Step 1 - Setup the same as Map editor provide mul locations.
Step 2 - Press new, you will be presented with a grey screen. turn on Grid
Under, Veiw > Grid . then simply turn on palette in view palette. then
just click and drag things from the palette to your gret grid. you can
either save to a Mlt file, or save to your Multi.idx in ultima. both can
be imported into Map editor for placement.
Placing Altitude - Unlike map editor, you can set your placing altitude for walls and such
using the Placing altitude, you can either press "G" on your keyboard, or go to options
Placing Altitude,
The Clipper tool - Avalible in both Multi editor and Map editor when it is enabled
you can select to veiw things at certain altitudes. that way
can see inside your buildings.
7.)UO Copy
And finally on to UOCopy, if you want to copy a portion of another map
to your map use this program. when you load it you will be presented with the
source and destination.
Step 1 - Use UOAM (uoautomap) to select the area you want to copy in the source map files,. you will need the top left X and Y value, and the Bottom right
X and Y value.
Step 2 - Now go to UOcopy enter in the x and y cords you got, top right goes in the feilds for X and Y, and the bottom right value goes in the second X and Y value. you will also see Off X and Off Y that is the location on your new map
you want to place your copyed rectangle. it represents the top left corner of your copy offset..
Step 3 - enter the source Map file and the Items.wsc location we disscussed in the Worldforge section (if there is no wsc file there thats ok it will make one)
Step 4 - Press Copy map then press copy statics... it will copy the statics to
the items.wsc, then exit
Step 5 - Load up worldforge, and press Getstaticindex then press Freeze!
it may take 5 to 10 mins Relax,.
Errors with this process
The max number of items Worldforge can handle is 65000, so if you have a bigger area then that,. you will have to make multiple rectangles..
This has been a Mogbert Tutorial,
Please also thank the staff and ryandor, and punt personally. for being patient tutors of me
Any questions PM me here or send me an Msn message at [email protected]
If you find this post useful please click my karma button and leave your
comments,. thanks alot!!
(to the Mods, i posted this in both 3rd party and FAQ's because i didnt know
where to post because i explain how to use alot of 3rd party software here aswell, please delete which ever is in-apporpriate)
Ok i decided to write this FAQ for people wishing to make a map from nothing
there are some 3rd party programs you will need. as well as RUNUO
and ill give you a couple websites to help you out aswell..
First the programs i would recommend getting are
all these programs have different limits when it comes to making a map
so trust me and download them all.
1.)First steps
2.)Dragon or mapgenerator (well get into that after)
3.)RUNUO
4.)Pandoras Box 2
5.)Worldforge
6.)Map editor, Multi editor
7.)UOcopy
1.) First steps
issues to resolve first
- First in your Ultima online dir you will have to delete all the files that say
Mapdif0.mul mapdif1.mul or statdif.mul anything with a Dif in it.
If you do not parts of the original felluca/trammel map will appear on your
new map.
2.)Dragon / Worldbuilder.
Both are avalible at Ryandor.com
Step 1 The Choice - First you have to make a choice. i would recommend
Dragon mod 11 for the newbie. because worldmaker involves more work
but can do more... first Dragon cannot handle 3 way transitions thats the
Main difference, for example if you have a road that goes through grass
and connects to mountain where the road mountain and grass meet it
will look messed up, and you will have to go over it again in worldforge
and fix it later. its not really a big deal anyway but some people think it
is. Ill explain dragon. because this post is for newbs.
Dragon mod 11
Step I Installation - First install dragon. depending on weither you
get dragon in a RAR file or a EXE file the installation is Different. either way youll end up with a directory called lets say "c:\dragonmod11\" just to make it easy, you will need either Adobe Photoshop or Gimp, If you dont have Adobe and dont want to buy it, you can download Gimp from GIMP - The GNU Image Manipulation Program
Step 2 Setup - You will need to map a BMP file that is 6144 x 4096 in either Adobe Photoshop or Gimp,. you will need to load the swatchs from the "c:\DragonMod11\Addon" directory this will give you a list of different colors all which will have a label such as Ocean -5, Grass 0. the
name is what you will be drawing with. if you use grass when you compile the map that area will be grass ETC. now that you have swatchs added your color the left side of the map specifically from pixel 5123,0 to pixel
6144 x 4096 (bottom right corner) with Black 0, that will make the area
that is required for dungeon building. i recommend making the rest of the map Ocean -5, so now you should have about 3/4ths the map Blue and
about 1/4th black.. ok thats your template save that.
here is an example of how it should look
Step 3 Creation - Feel free to fill your ocean with the love of some islands of your creation. personally i would leave the dungeons black. and just leave big open "grass 0" areas for your citys (ill explain why in worldforge and map editor later)
Step 4 Things you should know - make all your in-land rivers with
water -5, instead of ocean -5, also you must make somthing approx 10 or more pixels of water -5 around all the shores of every island, and the mainland. so it might be prudent to paint your Ocean -5, white first since it is very hard to distiguish, the Ocean -5 to the Water -5 swatch. now if you dont surround your islands with water -5 your shorelines will be messed up beyond repair. so listen to me i know. also you cannot make the whole world water -5 since everything made with water -5 becomes shore you will have so much lag god couldnt make your server work. not to mention you would need about 25 gigs of ram to compile the map. so listen to what i say.. also to keep your ground looking nice. make sure if you have say sand beach to grass to jungle there is atleast 3 distance between the sand and the jungle or none at all because it needs space to transition things out. otherwise youll get transition errors like mad. another thing to know each pixel represents 1 tile in game. so 1 pixel of grass = 1 tile of grass in game..
Here is a picture of my map so you can get a look at a complete map prior to compiling
Step 5 Compile me baby - after you have completed the map to the point where you are happy save it, (of course) leave adobe or gimp,. and load Dragon,. you need to fill in 2 feilds BMP file needs to know the Location of your .bmp file you made. Mul needs to know the location of your map0.mul file. so fill in those feilds and press compile. and let it make your map...
Step 6 Dragonsp - after you complete making the map load the program called Dragonsp it needs to know where your static files are so provide it with your Ultima Dir. also on the left side it wants to know what you want to create,. select all the txt files to the left. this is whats responsible for building your coastlines, forests and etc.. if you want to change what is in forests, or on grass,. for example i removed trees from grass so players could build houses easyer,. go to the text documents in the dragon scripts dir load "grass" or whatever you wish and delete "green tree" and the instructions that follow. you can also decrease the frequency they are spawned by changing the second number. they are in C:\dragonmod11\scripts\items\*.*
if your interested.....
Now you can load your basic map in game "on to the next steps"
3.) RUNUO
install RUNUO set it up and make sure it works. download from here RunUO.com - The RunUO Gaming Network
Next follow these steps
Step 1 - Make a new directory in Runuo.
I.E C:\RunUO 1.0\Custom Maps\
Step 2 - Copy and Paste the files staidx0.mul, statics0.mul to the
new folder you have just created above.
Step 3 - go to C:\RunUO 1.0\Scripts\Misc\Datapath.cs
Open Datapath.cs within the first few lines you will have to
change it to this.
What this Does - makes it so that RUNUO, now uses the files in theusing System;
using System.IO;
using Microsoft.Win32;
using Server;
namespace Server.Misc
{
public class DataPath
{
/* If you have not installed Ultima Online,
* or wish the server to use a seperate set of datafiles,
* change the 'CustomPath' value, example:
*
* private const string CustomPath = @"E:\Program Files\EA GAMES\Ultima Online Mondains Legacy";
*/
private static string CustomPath = @"C:\RunUO-1.0.0\Custom maps";
Custom Maps directory as the servers static files
this way you can add to them without effecting your
Client
Adding to Static Files In Runuo - its much like the [wipe command
first you build a structure or trees etc. then you
type the command [Freeze and select the area that
you wish added to the static files...
Seeing what you have done in the game - For you or your players
to see what you have done in the game. you will
have to copy the Staidx0.mul and Statics0.mul from
your custom maps directory into your Ultima online
Directory. (you do not have to restart the server.
to do this but you have to turn off your client
while you do.) you can send these files to your
players and have them also put them in there
game dir and replace the original files..
4.)Pandoras Box 2
you should get this program because it makes map making easyer
big time. it has a list of all static items in the game. and a roof builder
that makes building in RUNUO alot easyer. you can get the program from
here but you will have to sign up. Welcome to LEARNUO.COM
Step 1 Setup - When you install Pandoras box it will ask you a bunch of
questions. name fill it all in. you will come to a part where it asks you
if you use Custom maps. say NO it doesnt work right if you do. also
do not enable box server either. you dont need it to edit the map.
Step 2 Functionality - Lets go through a few functions you can use ok 1
go to the Deco subsection,. there is a list of Deco you can use to decorate
your houses,. build houses, build docks etc.. Pandoras box has the most
in the way of items for you to add currently. also its easyer to build in RUNUO
then map editor i find. ill explain map editors best functions later. ok another
function youll need to know. is go to the tools subsection, then Options and
Select it, select the map section in there. for editing purposes select Felluca
Only, everytime you make a big addition to the map, you will have to use it to
Refresh the map image. so remember that..
Step 3 tips and trick - Not to many tips and tricks in here but, one of the nice
things about the tools page is you will see roofing. its not to hard to do. to
make some roofs others are harder ill give you some tips first how to place a
roof. if you build a roof its at the top of the walls. generally 20 z if your ground
is zero and you have no foundation on the house. so lets use that..
in the roofing tool. what you will first see is 2 x/y cords with "get from client"
underneath where should you start and finish a roof. the easyest roofs are
goes up and tent. go with tent and select a ceramic roof of your choice and
my little template ill make here for an example.
Ok the black is your grid, the red is your house walls, where the Green is press the first "get from client" you will notice numbers fill int, now from the Blue X place your second "get from client". select Tent from the list. then select a ceremic Tileset,. change the height to 20 so on top of your walls and press add section,. in the window to the left you will see something that looks very similar to this..
that is your roof by layer. you can choose to Test your roof and it will show you the 4 corners first before you generate it completely,. or just generate,. when you are done your roof will be done.. (things that commenly happen that get on your nerves is the UO client will act up and spawn only some of your roof. it sounds retarted but to fix this. keep running around in your client while the roof generates and it will keep the generation active) anyway, if your satisfied with your creation you can commit by Freezing it like we covered in the RUNUO section.
5.)Worldforge
You can get worldforge hereRyandor.com
This section is to explain worldforge, ok now install worldforge. much like dragon there is an installer version and a RAR version,. you should non-the less get a folder called "c:\worldforge\" lets say. run Worldforge.exe. now when you run it
it will ask you again for your statics, staidx. mul locations, enter the location of those for worldforge (example c:\program files\ea games\ultima online\statics0.mul)
now it will also ask you for somthing called items.wsc
Items.wsc
you dont need to enter this unless you want to copy portions of a map to your map. say you wanted to keep britain in your map,. you would need to enter a location. (its for UOX aswell) anyway Items.wsc just enter a folder i recommend your ultima online folder so enter "c:\program files\ea games\ultima online" or whatever. ill explain this file more with UOcopy.
Map Editing in Worldforge.
Although map editor has some really neet functions ill tell you about worldforge anyway. some of the things you can do. first you can set and altitude it will stay at that altitude while you edit, unlike Wfmap. so if you intend to make a town at level 20 altitude i recommend making the streets in this. to map edit simply click the map edit function. and select the proper locations for your map and art files.
if it doesnt show your map right away reload worldforge. you can enter map cords to go to. or move around the map and edit at your will.. you can select a tile from the list or select random grass, dirt etc from the list. why you need worldforge,. WFmap's pallete is kinda limited at this point and it its alot easyer to work on elivated places in worldforge because of the lock altitude function.
Making caves.
the easyest way to make a cave,. go to runuo. find the map cords you want to be a cave, write them down. close runuo. and go to worldforge. go to those cords. flatten all the mountain to the altitude of outside the cave lets use 0 grass just because.. no close worldforge re-open runuo. and pandoras box. go to the location,. and use pandoras box to build a cave. with walls etc. connect it to the side of the mountain so that the cave tiles meet the transition tiles. then [freeze the cave. go back to worldforge raise the mountain all back up and and add an entrance to where your cave meets the side of the mountain.. ( you cant see static files in worldforge. so the best way i found to do it. is Delete the 3 or 4 mountain to grass transitions, start your cave from that spot. and when you freeze it. just make a cave entrance where the deleted transition tiles are.
STEP 1 STEP 2
Like i said step 1 lower all the area Then go back to Worldforge
you want to be cave to 0, change it to And turn all the grass at altitude
grass aswell (will be easyer to spot 0 to mountain 30, and add an
in worldforge) then go to runuo and Entrance..
pandoras box build the cave (you
can even dye it) freeze it.
Legend
Green - Grass at the Altitude of Zero.
Grey - Mountain at the altitude of 30
Blue - Cave tiles made by pandoras box at the Altitude of 0 like the grass
That about covers it for worldforge
6.)Map editor
Map editor is a great program. you can get it here http://worldmaker.ryandor.com/news.php
or here (which you have to get the pallete from anyway
Ryandor.com
its quite easy to use and can almost do anything. its team partner is called multi editor ill explain that after....
Step 1 - First you need to download and install it, and download and install the QTcore 4.1.2 *.dlls and the ming .dll which you can get from the first link, and the pallette, that you can get from the second link (easy to install just unrar it all in the same dir. while your at it download multi editor aswell same page. ill explain that next)
Step 2 - ok when you load it for the first time. go to Options, Mul locations. and fill in all the locations of your Mul files,. (the ultima directory yet again. big suprise eh?) also as long as the pallette files are in the main dir,. they should work,. now there are 2 editing modes here Art and Terrain... first
I) Art - in art you can edit art by turning on Palette in >Veiw>Palette.
you can add walls plants etc. everything like runuo..
its a little harder to work with because unlike worldforge and
pandoras box. you cannot lock the altitude at the level you are
working at so you have to continually go back and set it for all items
what i have found it good for is
A.) placing cave entrances.
B.) doing dungeons (because normally they are all at 0 for the most
part
the reason for both is the fact that in this program you can see both
Art and terrain at the same time.
II) Terrain - although you cant set it to make random mountain, or lock altitude
you can see both terrain and art at the same time. which is great for
making your town layouts and your dungeon layouts. which is exactly
what i would recommend this program for at this point.
Problems with Map editor.
-Like i mentioned before you cant lock altitude
-The Palette is limited, it includes about a 3rd of the items
that are in pandoras box.
Great things about map editor.
-It makes creating dungeons and city layouts easy
-helps with cave entrances because you can see
your static tiles you placed with pandoras box.
Multi Editor..
This program allows you to build, buildings, or ruins or things to import
to the map editor program. youll notice the interface is almost identical
its installed into the same dir as Map editor, so you have the same
palette and it has the same limiting palette problem. i really havent used this
program much, because its far easyer at this point to create a building
using Runuo. but ill provide a lesson just because
Step 1 - Setup the same as Map editor provide mul locations.
Step 2 - Press new, you will be presented with a grey screen. turn on Grid
Under, Veiw > Grid . then simply turn on palette in view palette. then
just click and drag things from the palette to your gret grid. you can
either save to a Mlt file, or save to your Multi.idx in ultima. both can
be imported into Map editor for placement.
Placing Altitude - Unlike map editor, you can set your placing altitude for walls and such
using the Placing altitude, you can either press "G" on your keyboard, or go to options
Placing Altitude,
The Clipper tool - Avalible in both Multi editor and Map editor when it is enabled
you can select to veiw things at certain altitudes. that way
can see inside your buildings.
7.)UO Copy
And finally on to UOCopy, if you want to copy a portion of another map
to your map use this program. when you load it you will be presented with the
source and destination.
Step 1 - Use UOAM (uoautomap) to select the area you want to copy in the source map files,. you will need the top left X and Y value, and the Bottom right
X and Y value.
Step 2 - Now go to UOcopy enter in the x and y cords you got, top right goes in the feilds for X and Y, and the bottom right value goes in the second X and Y value. you will also see Off X and Off Y that is the location on your new map
you want to place your copyed rectangle. it represents the top left corner of your copy offset..
Step 3 - enter the source Map file and the Items.wsc location we disscussed in the Worldforge section (if there is no wsc file there thats ok it will make one)
Step 4 - Press Copy map then press copy statics... it will copy the statics to
the items.wsc, then exit
Step 5 - Load up worldforge, and press Getstaticindex then press Freeze!
it may take 5 to 10 mins Relax,.
Errors with this process
The max number of items Worldforge can handle is 65000, so if you have a bigger area then that,. you will have to make multiple rectangles..
This has been a Mogbert Tutorial,
Please also thank the staff and ryandor, and punt personally. for being patient tutors of me
Any questions PM me here or send me an Msn message at [email protected]
If you find this post useful please click my karma button and leave your
comments,. thanks alot!!
")
")